
Remember the commercial with the “Easy” button? When you press it miraculous things happen and all your wishes come true. This is what Oracle had in mind when it created the SOA Database Adapter. Perhaps I’m overstating this just a little, but the idea is to remove most of the pain from interacting with a database, allowing the user to focus on the important things – like retrieving, saving, updating and deleting information.
While it is true that using the basic functions of the database adapter within SOA 11g are indeed fairly easy, there, unfortunately, is a bit of plumbing that needs to be in place before your dreams of being a database querying god can be achieved.
Database Adapters at 30,000 Feet
Before diving into a detailed discussion of how to implement Oracle Database Adapters within SOA 11g, it might be useful to know what they are and why you should care about them. At the end of the day, Database Adapters allow SOA 11g to communicate with database end points, including database servers and any relational databases that comply with ANSI SQL and provide JDBC drivers. The adapter itself is a JCA 1.5 connector which is deployed to the application server during installation. Under the covers, it uses the designated JDBC driver and connector to communicate with the database.
In other words, the Database Adapter is doing what we’ve all been doing manually for years. The nice part is that it hides all of these implementation details away from the SOA 11g developer. In its place for every database operation you define, it exposes input and output xml, behaving like any other service within SOA 11g.

This graphic was borrowed from Oracle’s JCA Adapter documentation, which can be found at: http://docs.oracle.com/cd/E15523_01/integration.1111/e10231/adptr_db.htm.
The main architectural points here are:
- JDBC Datasource must be created within your application server
- A Database Connection pool must be linked to this JDBC datasource thru the JDBC Datasource JNDI name.
- In SOA 11g, the JNDI name of the database connection pool is used when setting up the database adapter
If you’re unfamiliar with JNDI, check out this Wikipedia article: http://en.wikipedia.org/wiki/Jndi. Essentially, think of the JNDI name as way to reference a specific configuration within WebLogic.
In Step 1 above, we will create a JNDI name “JDBC/CustomerStaging”. This represents everything that went into this JDBC connection including what type of database it is, what the login credentials are, database connection parameters, etc.
In Step 2, we’ll create another JNDI name representing the Database Connection Pool name. You’ll need this because SOA 11g Database Adapters always connect to the Database Connection Pool. Therefore, we’ll create a JNDI name of “eis/DB/CustomerStaging”. This will represent all of the settings for our new Database Connection Pool.
In Step 3, AND THIS IS REALLY IMPORTANT, we will use the JNDI name for the Database Connection Pool when setting up the database adapter. This is especially useful when moving your code from environment to environment. This means that your code itself isn’t tied to a particular database. Rather it just has a reference to a JNDI name. Therefore, in DEV, that JNDI name will point to your DEV database. In UAT, the same JNDI name will point to the UAT database and in Production … you guessed it … the JNDI name will point to the PROD database.
Let the Games Begin
Now that we’re through with our scintillating architectural discussion, let’s get down to business and actually run thru the steps of creating a working database adapter. If you’d like to see a simple project that demonstrates specifically how this works. For this demo, I’m running Oracle’s Pre-built Virtual Machine for SOA Suite and BPM Suite 11g.
First, let’s set up your database. Log into your local database as the SYSTEM user and run DBAdapterPrep.sql, which can be found in the zip file mentioned above (DatabaseAdapterPrep.zipDatabaseAdapterPrepDataModel). This will set up 1 user: CUSTOMER_STAGING. The password for this user is the same as its name. This script will also load 100 rows of sample data into the CUSTOMER_STAGING.CUSTOMER_SOURCE_DATA table.
Next, log into WebLogic Console.
Creating a Data Source
- In the Domain Structure Section, expand Services and then click on Data Sources

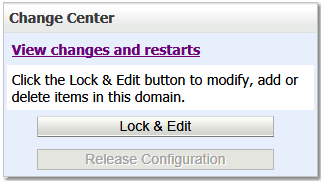
- In the Change Center section on the top left corner of the screen, click Lock & Edit. If you don’t have this option, don’t worry. That just means that in Preferences (which can be found at the top center of the screen), you’ve unchecked the option for “Automatically Acquire Lock and Activate Changes.”
- In the Summary of JDBC Data Sources section in the center of your screen, click New and then click Generic Data Source

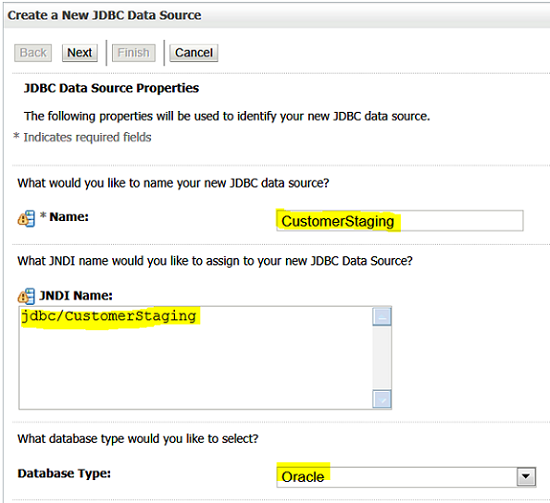
- Since we’re going to connect to the CUSTOMER_STAGING database, let’s set the name as “CustomerStaging” and then set the JNDI Name as “jdbc/CustomerStaging”. You can leave the database type as “Oracle”. Click Next
- On the next screen, you can leave the default Oracle Thin XA driver. However, you should always choose the appropriate database driver for your project. The support matrix for the Oracle Database Adapter is located on the following spreadsheet http://www.oracle.com/technetwork/middleware/downloads/fmw-11gr1certmatrix.xls. This spreadsheet came from the following page which contains information about all Fusion Middleware Supported Configurations: http://www.oracle.com/technetwork/middleware/ias/downloads/fusion-certification-100350.html. For our purposes here, accept the default and click Next

- The next screen, for our purposes, presents a message informing you that the XA driver you’ve chosen supports global transactions and uses the ‘Two-Phase Commit’ global transaction protocol. Whenever possible, always choose XA drivers when you’re using them for database adapters within BPEL or BPMN projects. This is because if you execute several database scripts within a single scope and then experience an exception, the process engine will be able to roll back these changes in order to recover cleanly. If you want to learn more, I would highly recommend the following article which does the best job I’ve seen so far of discussing how XA transactions work in a business process: http://www.oracle.com/technetwork/articles/soa/wli-bpel-transactions-088255.html. For this example, you don’t have to do anything on this screen but click Next.
- Here you will define the connection properties. Please note that the ones I’ve listed are specific to the Oracle VM VirtualBox instance I’m using for this demo. Click Next when finished
- Database Name: xe
- Host Name: soabpm-vm
- Port: 1521
- Database User Name: CUSTOMER_STAGING
- Password: CUSTOMER_STAGING

- Here you will define the connection properties. Please note that the ones I’ve listed are specific to the Oracle VM VirtualBox instance I’m using for this demo. Click Next when finished
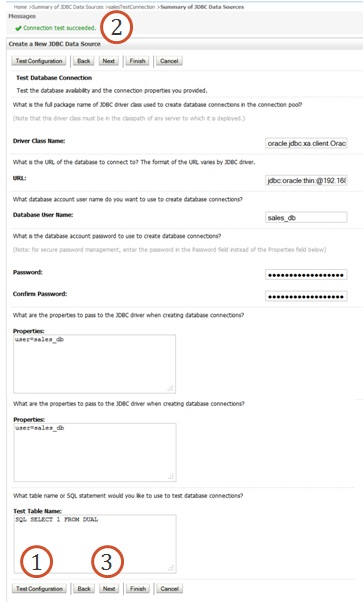
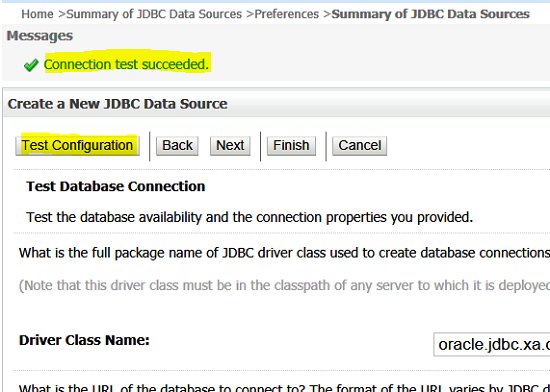
- On the Summary page, be sure to click “Test Configuration” and even more importantly, be sure that you see a success message stating “Connection test succeeded.” If you don’t see this, go back and correct any problems you have in the prior screens. Once you get a success message you can click Next.
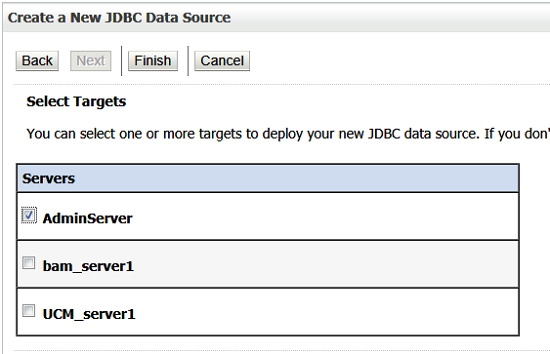
- For this example, simply choose “AdminServer” as your target. However, for a real project, this will depend greatly upon how your environment is configured. In a real implementation, you would probably target your SOA or ADF cluster rather than the admin server. Click Finish.
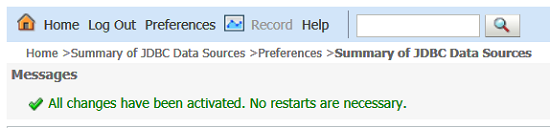
- In the Change Center section in the upper left of your screen, click Activate Changes and be sure that you see a message saying “All changes have been activated. No restarts are necessary.” It’s important to note that if you ever need to update your data source, you will need to restart your WebLogic server before the changes will take effect. This message at the top of your screen will always inform you if a restart is necessary.
Creating a Database Connection Pool
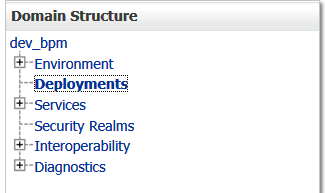
- In the Domain Structure panel on the left, click on Deployments
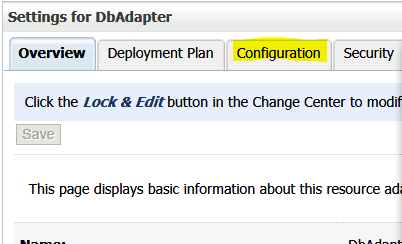
- In the Summary of Deployments panel in the middle of the page, click on the DbAdapter link

- In the Settings for DbAdapter panel in the middle of the page, click on the Configuration tab
- Click on the Outbound Connection Pools tab
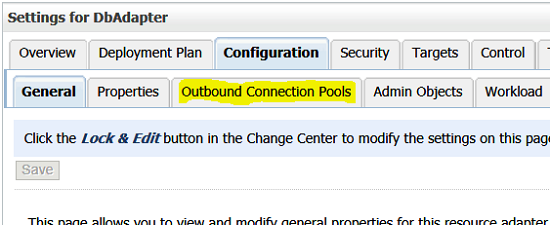
- In the Change Center section on the top left corner of the screen, click Lock & Edit.
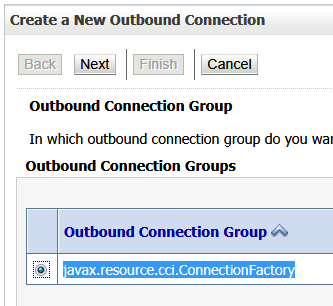
- In the Outbound Connection Pool Configuration Table, click New

- In the Outbound Connection Groups table, select the radio next to javax.resource.cci.ConnectionFactory and click Next
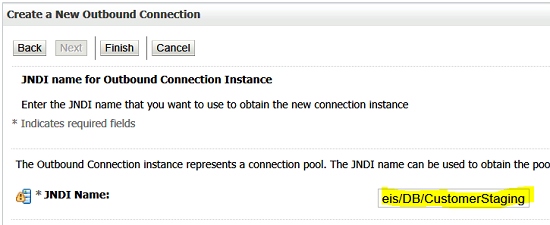
- Set the JNDI Name to “eis/DB/CustomerStaging”. This is how we’ll identify this Outbound Connection Pool. Click Finish
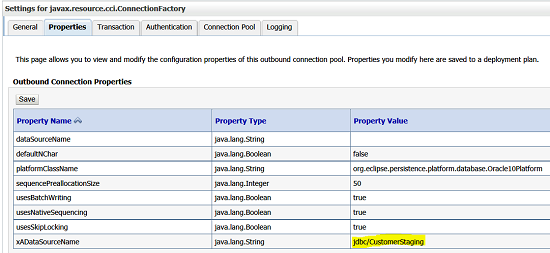
- In the Outbound Connection Pool Configuration Table, expand javax.resource.cci.ConnectionFactory and click on “eis/DB/CustomerStaging”

- In the Settings for javax.resource.cci.ConnectionFactory panel, click on the Property Value column within the last row, which is labeled “xADataSourceName”. It is important to note that before click away from this cell, you must hit the Enter key for this change to register on the screen. The following link describes specifics around each of these settings: http://docs.oracle.com/html/B25307_02/adptr_db.htm#CHDDCFDJ. If you are connecting to a non-Oracle database, you will need to change the platformClassName, which is also discussed in the link. For our purposes here, once you see the new xADataSourceName in the table, click Save
- Be sure that you see a message at the top of the screen saying “Deployment plan has been successfully updated.”

- In the Domain Structure panel on the left, click Deployments
- In the Summary of Deployments panel in the center of your screen, click the checkbox next to DbAdapter and then click Update

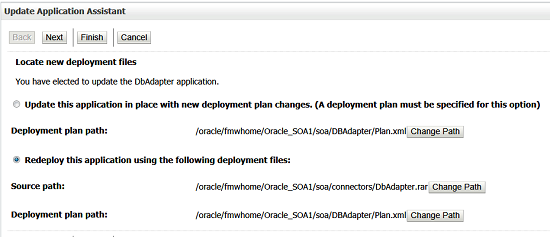
- In the Update Application Assistant panel in the center of your screen, be sure that the following radio button is chosen: “Redeploy this application using the following deployment files”. Note that this screen shows the location of 2 files that are about to be changed. Click Finish
- Make sure you see a message at the top of the screen saying, “Selected Deployments were updated.”

- In the Change Center panel in the upper left corner of your screen, click “Activate Changes”
- Again, ensure that the message that the top of the screen reads, “All changes have been activated. No restarts are necessary.”

Using a Simple Database Adapter in BPEL
For the purposes of this article, we’re going to set up a very basic database adapter in a BPEL project to neatly tie up this discussion. A more complete discussion of all of the many features of the SOA Database Adapter can be found at:
http://docs.oracle.com/html/B25307_02/adptr_db.htm.
- Create a new SOA project in JDeveloper
- Open up your composite. In the Component Palette on the right, locate the Service Adapters section and drag the Database Adapter over to the External References column in your composite. When the Adapter Configuration Wizard comes up, click Next

- On the Service Name screen, I’m going to enter “RetrieveAllCustomers”. Click Next
- On the Service Connection screen you have to do the following two things and then click Next:
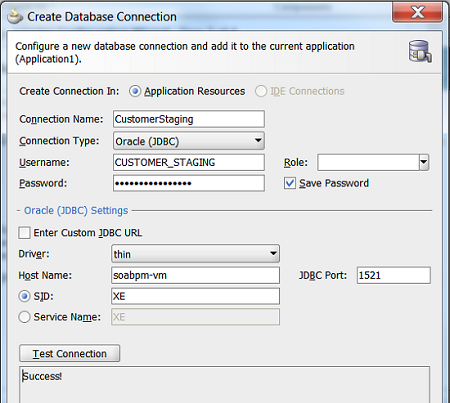
- So JDev can introspect your database, you will need to set up a local connection. You can do that by clicking on the “+” sign and filling out the connection details (which I covered above in item #7 under “Creating a Data Source”). It is easier if you always remember to name your connection name like the final part of your JNDI Data Connection Pool Name. In this case “CustomerStaging”
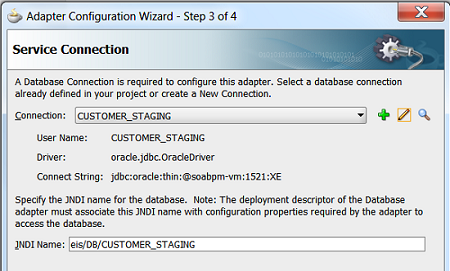
- Be sure that your JNDI name here is the same as your Data Connection Pool JNDI name: eis/DB/CustomerStaging. If you named your local connection as I recommended above, JDev will automatically default to the correct name
- On the Operation Type page, for our purposes here, select the “Execute Pure SQL” option
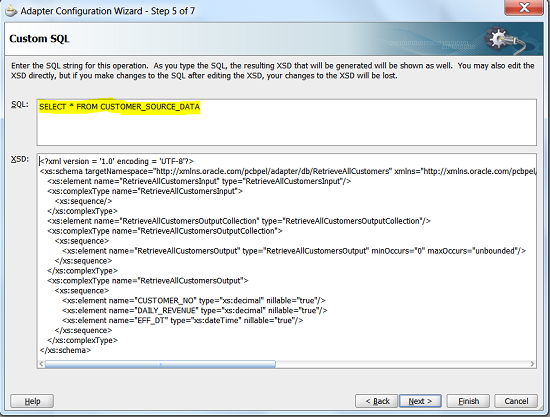
- In the Custom SQL page, enter “SELECT * FROM CUSTOMER_SOURCE_DATA” and click Finish and then click Save
- Create a basic synchronous BPEL 2.0 process called “TestRetrieveAllCustomers” and wire it up to your new Database Adapter control in the External References column

- In my BPEL process, I created a request and response variable for our query.

- Here’s the basic BPEL process to call our Database Adapter

- Deploy the project to your server
- Open up Enterprise Manager and test out your BPEL process. Here are the results I got:

Release the Hounds

If you’ve managed to slog your way thru this whole example successfully, you’re now officially a database querying god. Be sure to check out some of the links I’ve provided in this article because they provide a lot of good, detailed information on various aspects of this topic that I guarantee you will encounter in real projects. Also, be sure to check out my upcoming blog posts that will discuss more advanced topics such as:
Getting Testy with SOA 11g – Part 1: The Integration Service Pattern
Getting Testy with SOA 11g – Part 2: The Mock Web Service Pattern
Happy querying to you until we meet again.