
Okta is a popular enterprise identity and access management provider, and the Anypoint API Manager enables you to govern and secure Mule APIs with a comprehensive policy library and integrated access management.
I am going to guide you through the set up of Okta as the OpenID Connect (OIDC) Identity provider for your Anypoint organization so you can use its OAuth 2.0 authorization server and access management capabilities to secure your APIs.
OIDC is an identity layer on top of the OAuth 2.0 protocol and I am going to cover OAuth 2.0 using the client credentials grant. However, this setup will let you implement other grants and add the OIDC layer.
According to the MuleSoft documentation, this process should work for any standard OpenID Connect Identity Provider that supports Dynamic Client Registration.
The diagram below gives a quick overview of the OAuth dance (OAuth authorization process) used for the client credentials grant type, which is used for machine to machine applications. With this grant type, there is no user involved in the OAuth dance. In Okta, the token URL (/token) of your authorization server is used by the client application to request the access token, and the token introspection URL (/introspect) is used internally by the API Manager policy to validate the access token. We are going to review every step in detail in the following sections.

Prerequisites
There are few things that you need to make sure you have set up and signed up for before you get started:
- A Platinum or Titanium subscription. The feature that allows integration with an OpenID Connect Identity provider is called External Identity Management
- You need administrator privileges to the Master Organization in Anypoint Platform. If you don’t have Admin privileges, you can sign up for a trial account here: https://anypoint.mulesoft.com/login/#/signup
- An Okta Account. You can get an Okta Developer Account here: https://developer.okta.com/signup
- An API deployed, active in the API Manager, and published in Exchange

What We Are Covering
- Set up Token Introspection Client app in Okta
- Generate SSWS token in Okta.
- Register Okta as an OpenID Connect Identity Provider / OAuth 2.0 Authorization Server in Anypoint Platform.
- Register your API in Okta and add the client credentials grant.
- Add a custom scope in Okta and assign it to your application.
- Apply the OAuth 2.0 security policy to the Mule API.
Set up Token Introspection Client app in Okta
In Okta, add a new application by going to the Applications menu on the top of the screen, click on Add Application, select Web, and click Next. In the Application Settings form, enter the application name, check the Client Credentials Grant type, and click Done.
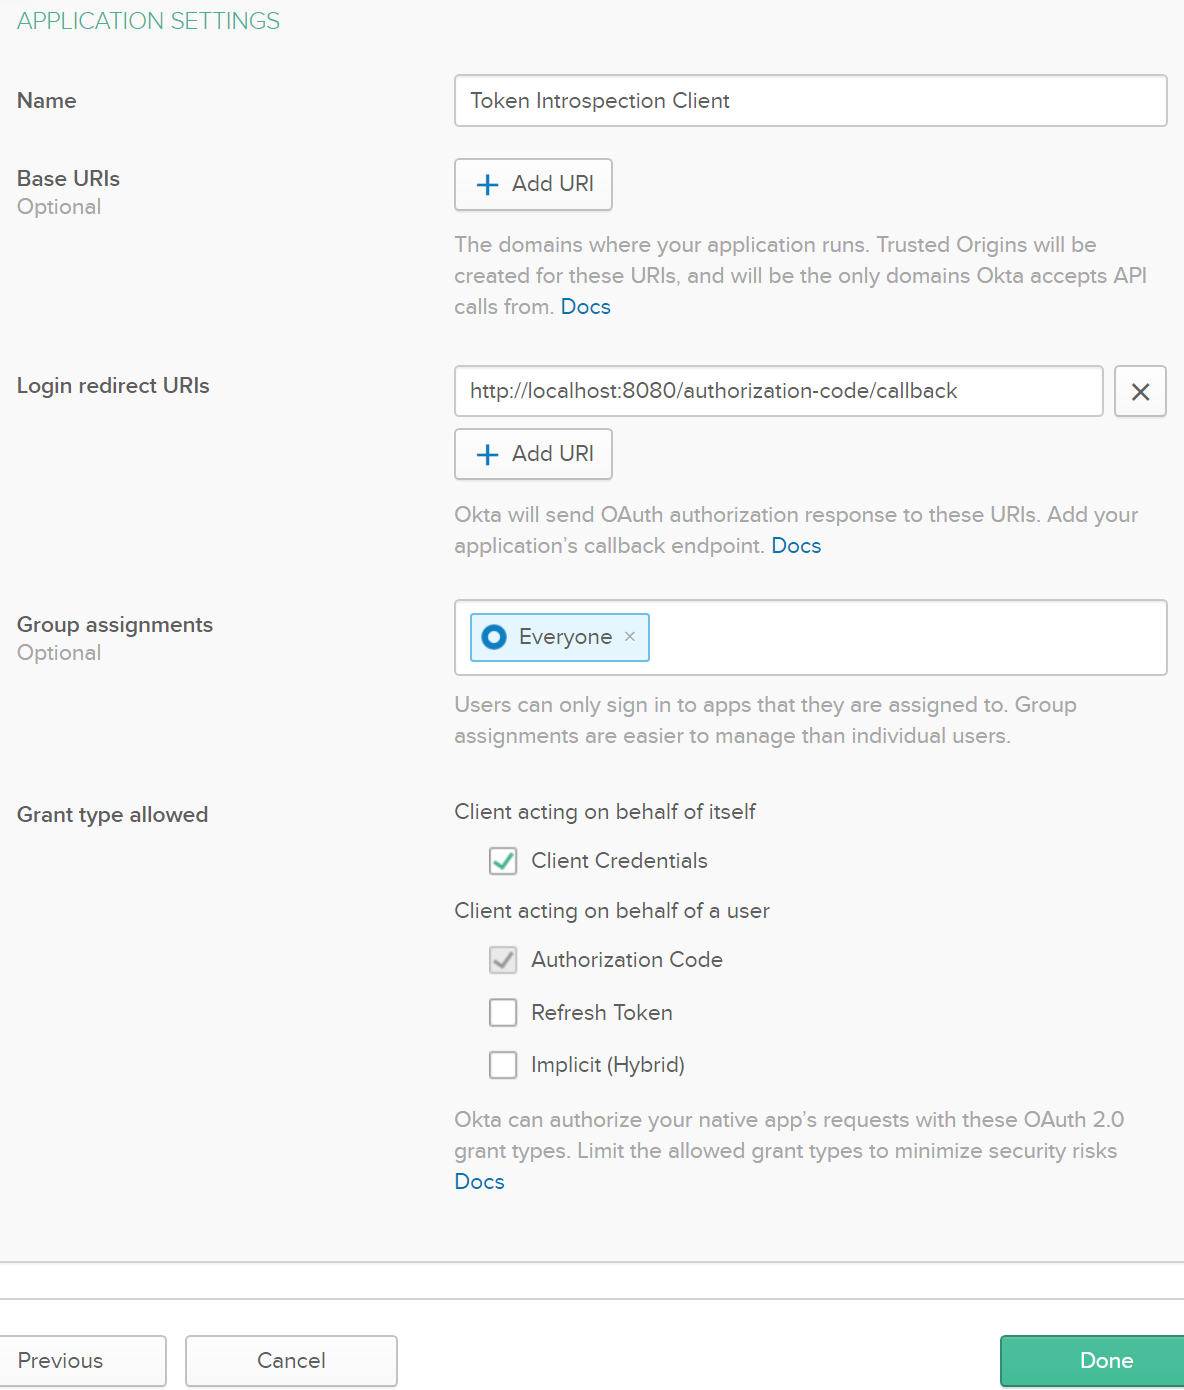
From the next screen, copy the Client ID and Client Secret in a notepad for later use.
I called the application “Token Introspection Client” to match the name in the Anypoint’s Dynamic Client Registration form. This will allow Anypoint’s API Manager to validate the OAuth 2.0 access token using the information provided by Okta’s introspection endpoint.
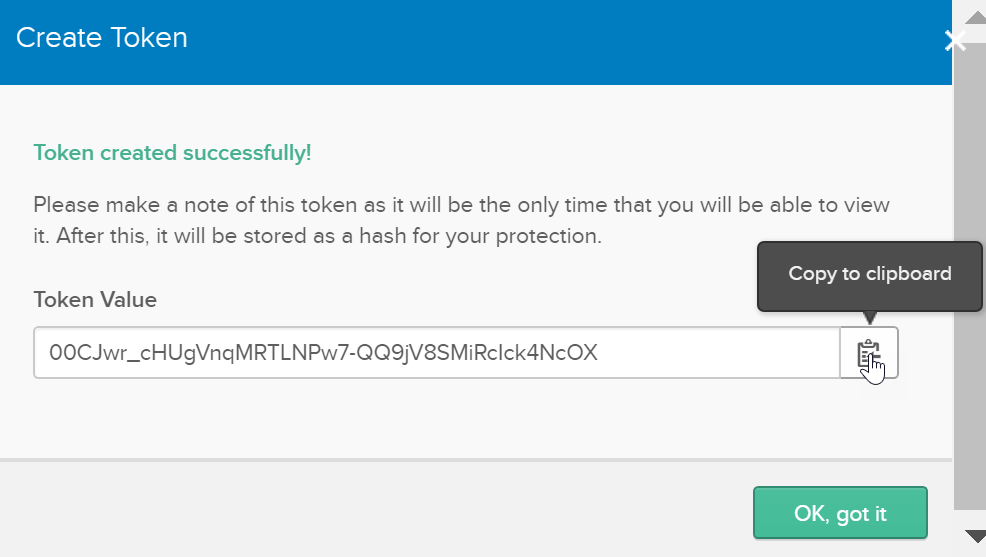
Generate SSWS token in Okta
In Okta, go to the API menu, select Authorization Servers, go to the Tokens tab, click Create Token, and copy the token in a notepad for later use. This is the Single Sign-On Web System (SSWS) token.
Register Okta as an OpenID Connect Identity Provider / OAuth 2.0 Authorization server in Anypoint Platform
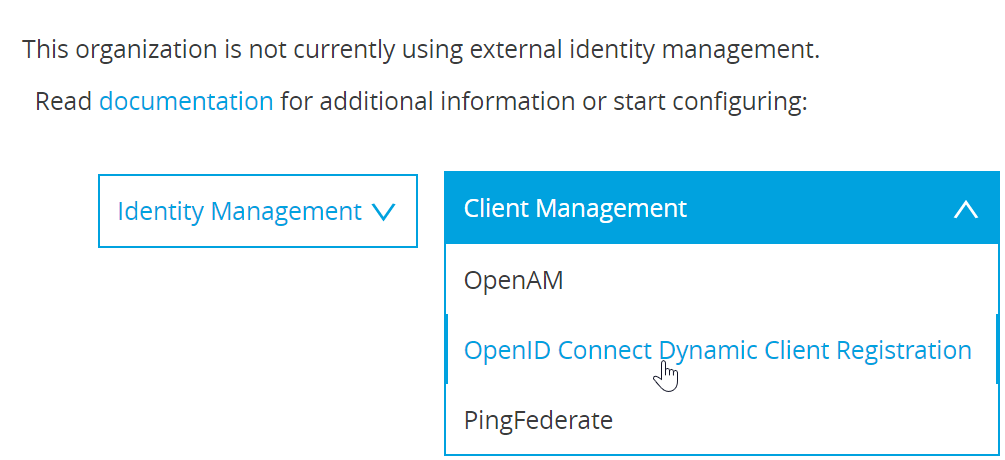
Go to the Anypoint Platform’s menu on the left, select Access Management under Management Center, then click on External Identity. Expand Client Management and select OpenID Connect Dynamic Client Registration.
Fill out the Dynamic Client Registration form:

The Client ID and Client Secret come from the Token Introspection Client app we registered in Okta in the previous section. The Authorization Token is the SSWS we also created in the previous section, and the rest of the information comes from the authorization server metadata in Okta.
To get the server’s metadata, go to Okta’s API menu and select Authorization Servers. Click on the default server (or the server you are using) and follow the metadata URI link to get the URLs needed and save the form.

Register your API in Okta and add the client credentials grant
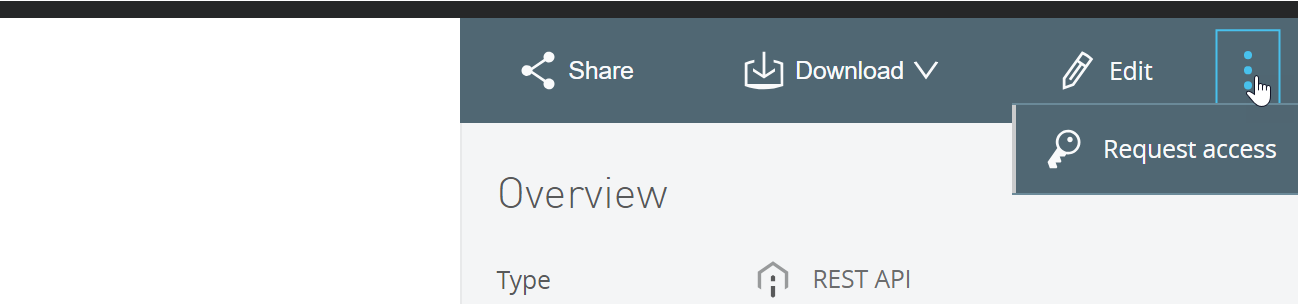
Go to your API in Anypoint Exchange and from the vertical ellipses select Request Access.
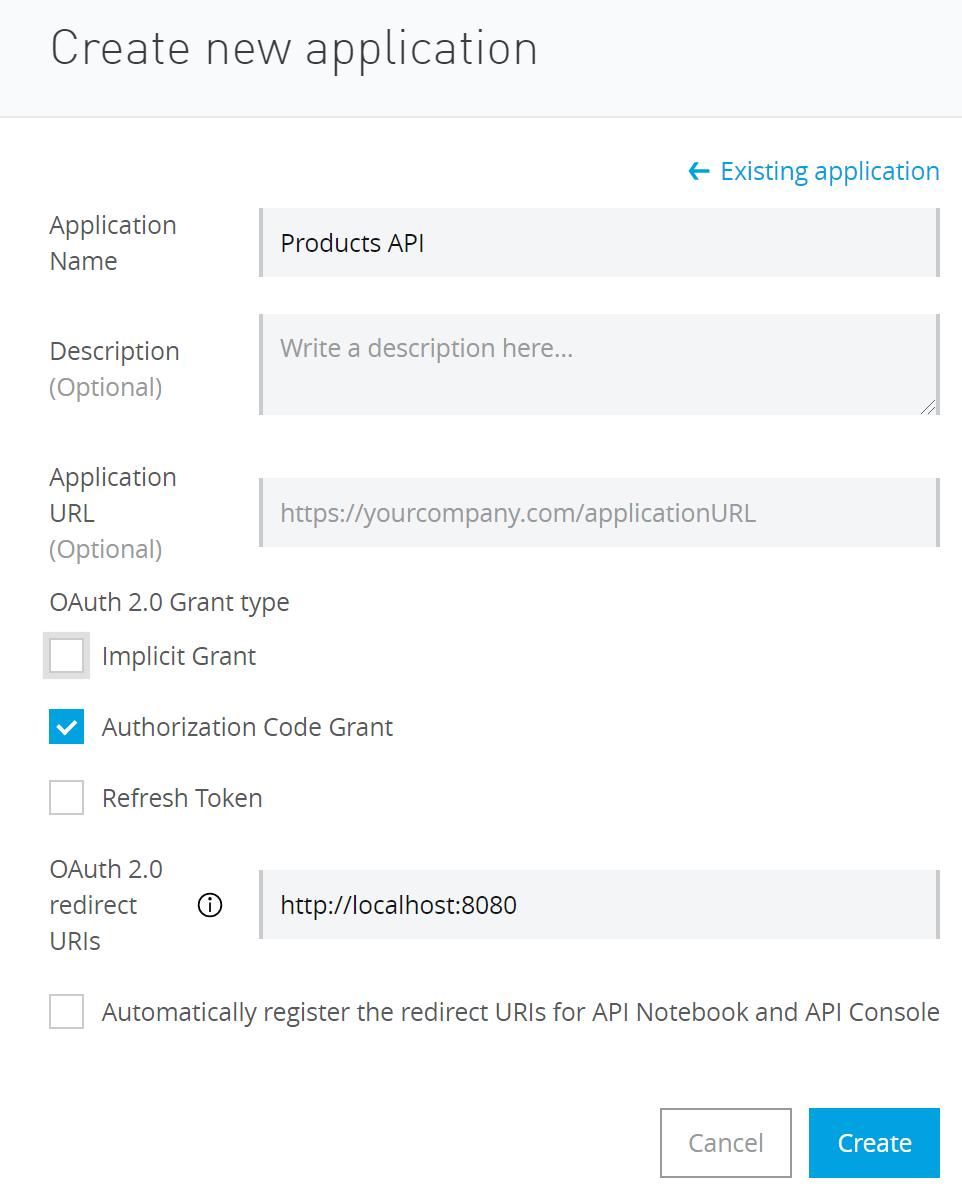
In the Request API access window, click on Create a new application. In the Create new application form, enter your application’s name, select Authorization Code Grant because you have to select a grant (later we’ll add the Client Credentials Grant in Okta). The OAuth 2.0 redirect URI is not needed for the Client Credentials grant flow, but I added it to try the Authorization Code grant flow later.
In the following Request API access window select the API Instance and click Request API Access. This step will create your API in Okta and will return its client id and Client secret. Copy the Client id and Client secret for later use.

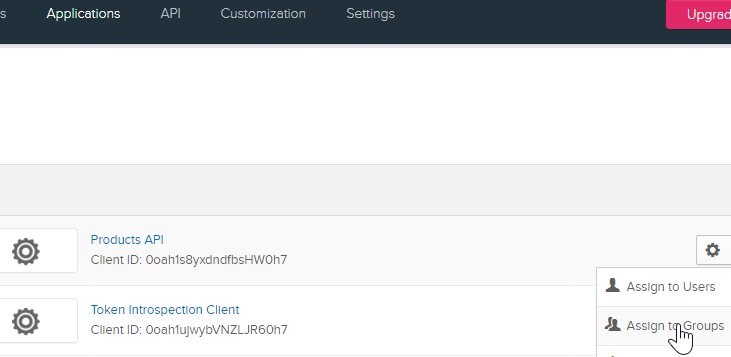
In Okta, go to Applications and you will see your application listed there. Click on the application’s settings gear icon, select Assign to Groups, assign to Everyone and click Done.
Then click on your application (Products API in my case), go to the General tab to display the General Settings, click on Edit, check the Client Credentials box and save it.
Add a custom scope in Okta and assign it to your application
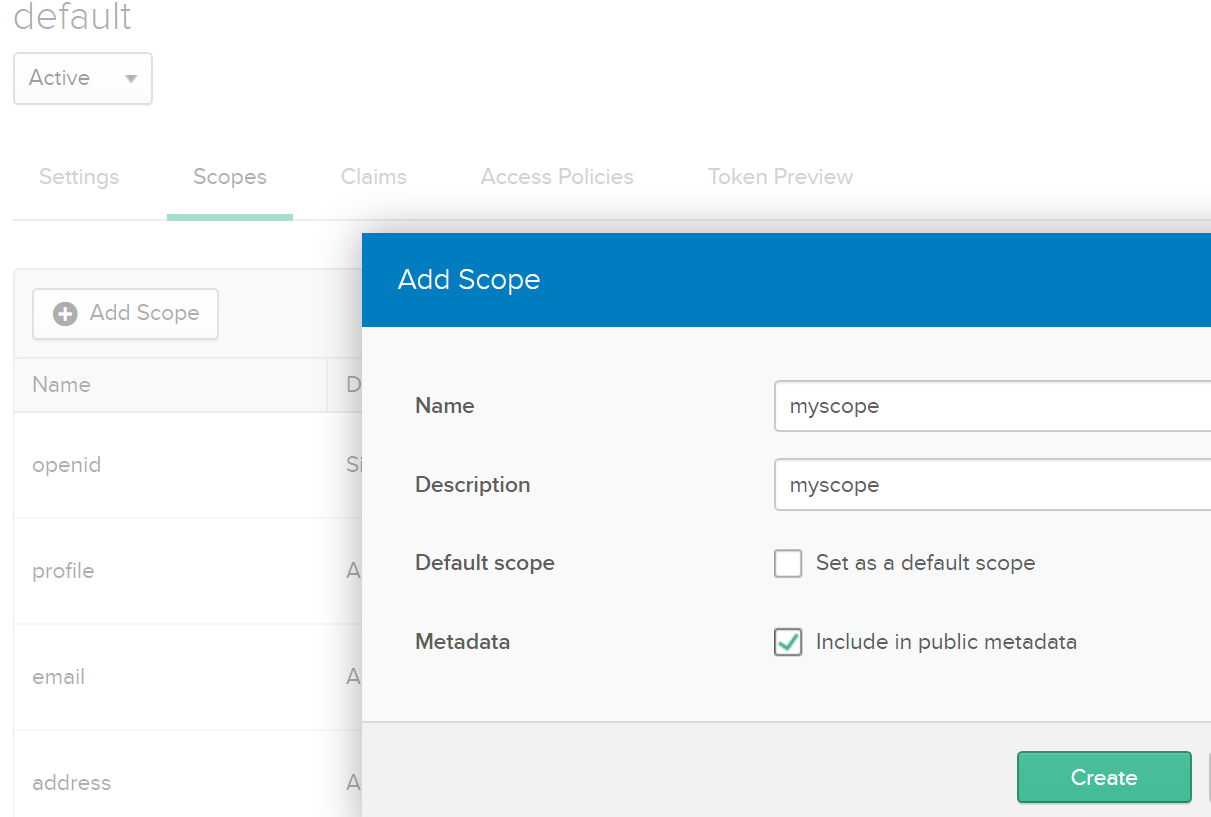
In Okta, go to the API menu and select Authorization Servers, click on the link to your server, and go to the Scopes tab. Click Add Scope and fill out the form to create “myscope.” We are going to authorize this scope in the API Manager when we apply the security policy.
Let’s note that the default access policies in Okta allow any registered app to use any scope and any grant assigned to the app to request tokens. You can add and customize access policies, but the administration of Okta is out of the scope of this blog.
Apply the OAuth 2.0 security policy to the Mule API
In Anypoint, go to your API settings in the API Manager and click on Policies.

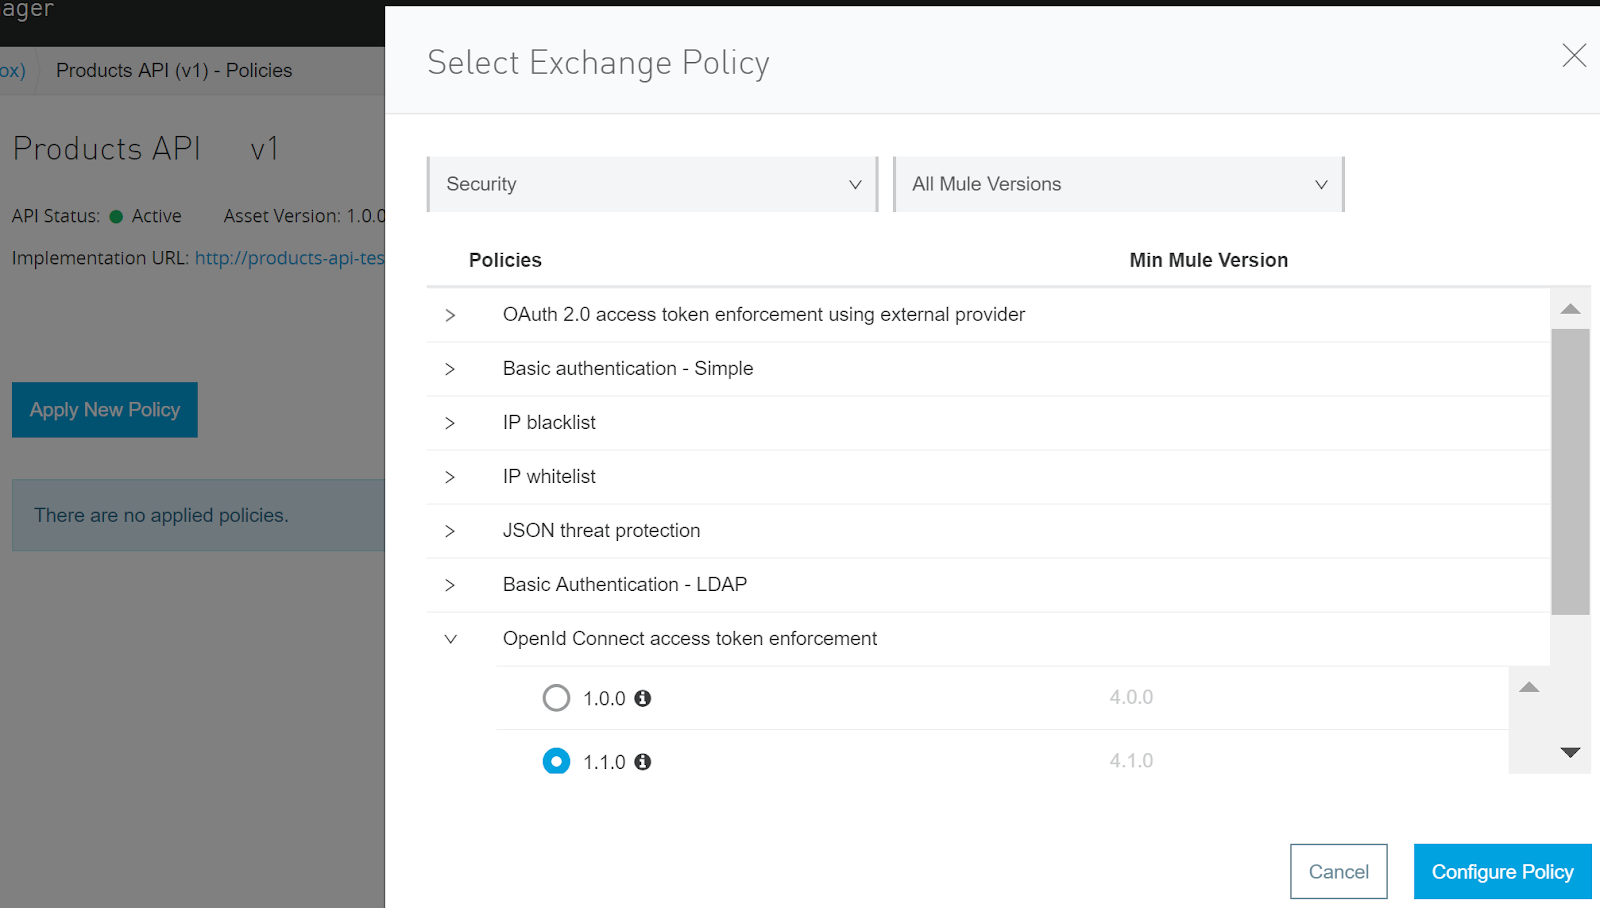
Click on Apply New Policy, in the Categories drop-down menu select Security, expand OpenId Connect access token enforcement, and select the version for your application. Click on Configure Policy.
Add “myscope” and click Apply. The policy takes about a minute to become in effect. I am applying the policy to all the API methods and resources, but you can also apply more granular policies and even create a custom policy according to your project needs.

The last step is to update your application’s RAML with the RAML snippet provided.

At this point, your API is protected. If you try to access it without a token you will get a 400 error “error”: “Access token was not provided.”
To get an access token you need to send a POST Request to Okta’s token URL (/token) provided by your server’s metadata when you filled out the dynamic registration form above. The POST request should be of content-type application/x-www-form-urlencoded, with the parameters grant_type=client_credentials and scope=myscope. Use basic authentication with your application’s client id as the user and client secret as the password.
Now you can make a call to your API by either adding the query param access_token with the access token or sending the token as a Bearer token in the Authorization header.
AVIO is a two time MuleSoft Partner of the Year winner, recognized for enabling customers to accelerate their digital transformation and its excellence in project implementation and practice development.
{{cta(‘7c51803f-e072-42fd-a1d5-ece0c8629db6’)}}