
The purpose of this post is to document, step-by-step, how to create cascading dropdowns in an ADF form’s user interface when ADFbc is used.
A cascading dropdown frequently occurs in forms and occurs when a selection made in one field’s dropdown automatically and dynamically changes the list of valid values in another field’s dropdown. This topic uses address fields for this example. After selecting a country from the country field’s dropdown list, the state field’s list of valid states or provinces is changed to show the list of states / provinces for the country selected.
Although there are videos that describe how this is done, it is invariable done with an unnecessarily complex database or the online lesson is missing key steps. The steps documented here use a simple database with three tables, it is written with the assumption that you are not an expert with ADF and most importantly – it has been thoroughly tested and it works.
Cascading Dropdowns in a User Interface
These are the two interdependent dropdowns that will be built following the steps listed in this topic.
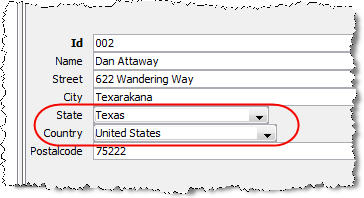
Once the Country is changed, the list of States/Provinces is automatically updated to reflect the states or provinces for the country picked

The Database
The purpose of this post is to explain how cascading dropdowns work. As a result, the database tables used were kept very simple.
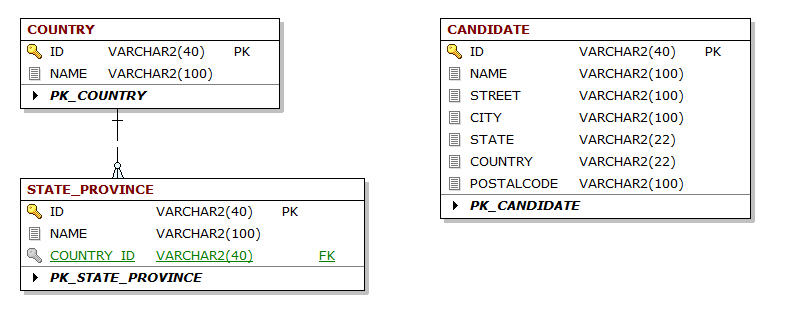
There is a one to many relationship between the COUNTRY and the STATE_PROVINCE tables (countries can have many states/provinces). These two tables will be used to create the two list of values (LOV) that will be used by the CANDIDATE table. The CANDIDATE table has a STATE attribute that will use a read-only view object called StateProvinceLOV for its dropdown list and the COUNTRY attribute in the CANDIDATE table will use a country view object called CountryLOV for its dropdown.
Before starting to follow the steps listed below, first run this SQL in an Oracle database schema that you have access to (e.g., if you have Oracle XE, you might want to run this using the existing HR schema that comes with it).
Create the Model ADF Project
After having run the SQL that creates and loads the three tables, you will create the ADF project that will use the database tables in this step.
Open JDeveloper and close your application if one is already open.
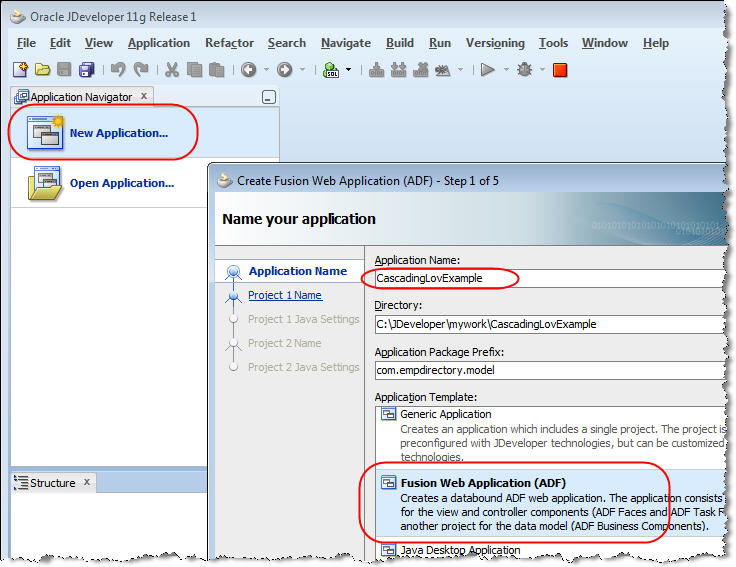
Click New Application -> Select Fusion Web Application (ADF) -> Name the Application CascadingLovExample -> click Finish.
After having done this, both a Model and a ViewController project were created. Everything that will be done in the remainder of this topic will use the Model project.

Steps to Creating Cascading Dropdowns in ADFbc Driven ADF Forms
(1) Add the Entity and View Objects in the Model Project
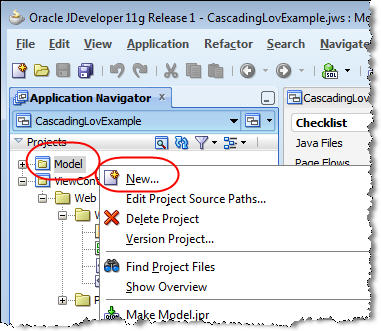
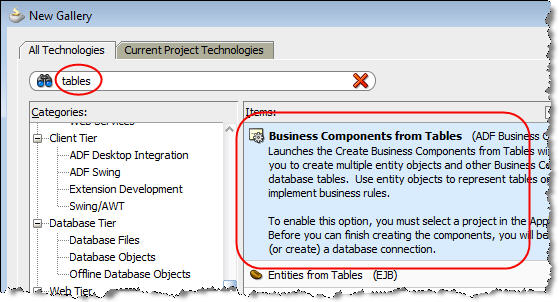
One way to add the Entity Objects (EO) and View Objects (VO) is to run the “Create Business Components from Tables” wizard. To start the wizard, right mouse click Model -> click New.
Enter the text tables in the search field -> select Business Components from Tables -> click OK to begin the wizard.
Connect to the Database Schema
Create a connection to the database tables that will expose the ADF Business Component (ADFbc) Entity Objects (EO) and View Objects (VO) by clicking the plus icon on the right.
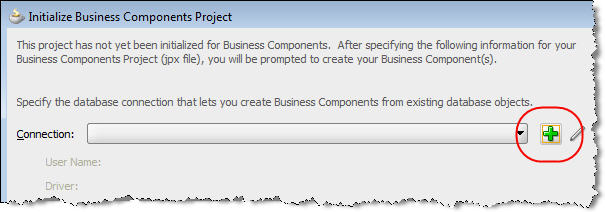 Because this connects to the HR database schema on my machine, I named it HR (if this is the first time you have accessed the out of the box HR database schema that comes with Oracle XE, be sure to have unlocked it before performing this step) -> in the Username field enter hr -> enter the password for the hr schema which is normally hr -> click the Test Connection button and ensure that that “Success!” is immediately displayed below the button.

Click OK.
Create the Entity Objects and View Objects
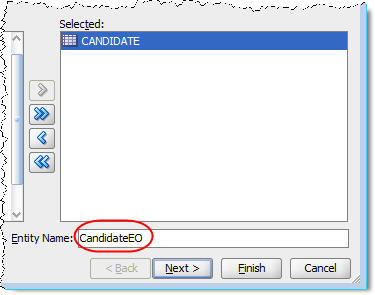
Select the tables in the schema to use as the EOs and VOs in the model by selecting the Query button. As shown below, then select the CANDIDATE table on the left and click the > button.
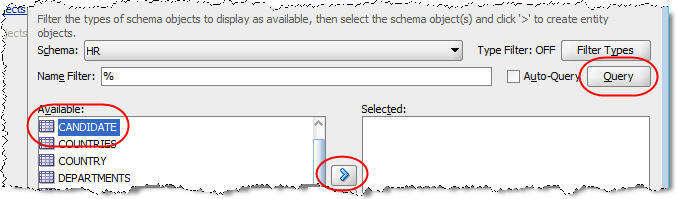
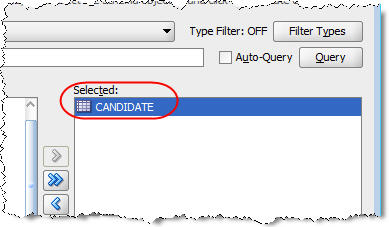
The CANDIDATE should now be in the “Selected” list on the right. The CANDIDATE table will be used to display and edit information about a candidate using its view object. This will contain both the state and country cascading dropdown fields.
Rename the Candidate Entity Object by changing its name in the field in the lower right corner to CandidateEO.
Click Next.
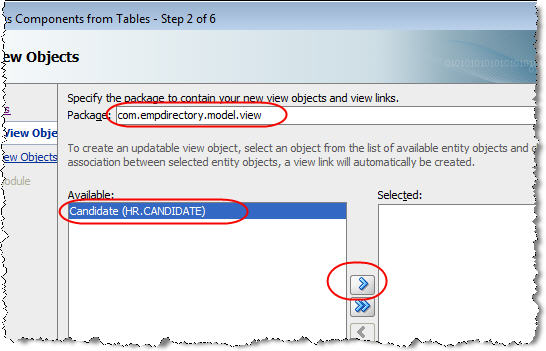
In the Updateable View Object step in the wizard, change to package name to end in model.view -> select the Candidate (HR.CANDIDATE) and click the > button.
Rename the Candidate View Object by changing its name in the field in the lower right corner to CandidateVO.

Click Next.
(2) Create the LOVs
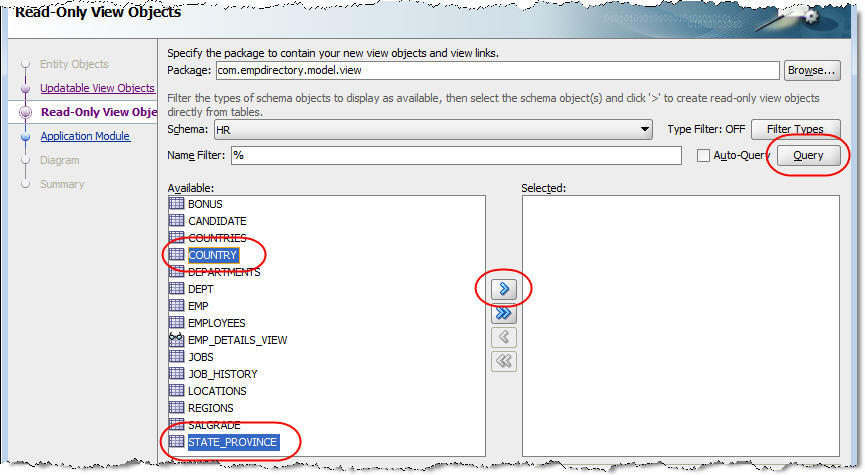
While the CandidateVO will be used to display the cascading dropdowns, in the Read-Only View Objects step in the wizard you will create the two lists for the cascading dropdown lists. Select the Query button -> select COUNTRY and select STATE_PROVINCE -> click the > button.
Select STATE_PROVINCE and change its name to StateProvinceLOV as shown below.

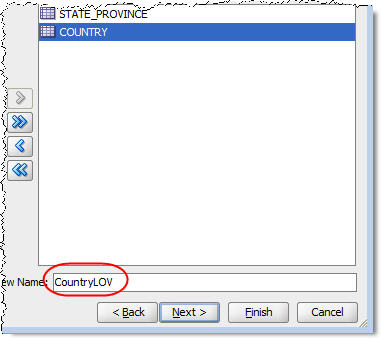
Similarly, select COUNTRY and change its name to COUNTRYLOV.
Click Next.
In the Application Module step in the wizard, change the name of the package so that it ends with model.apModule -> change the name of the application module to CandidateAppModule.
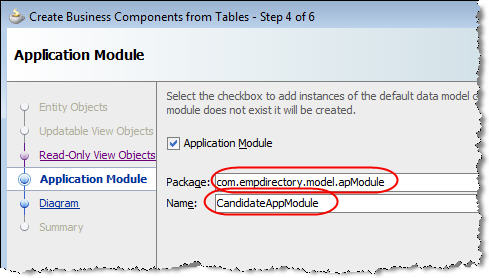
Click Next -> click Finish.
(3) Add the Bind Variable
Add a parameter that will provide the country to the StateProvinceLOV. You need this because you need to restrict the list of states shown to only be those for the specific country selected.
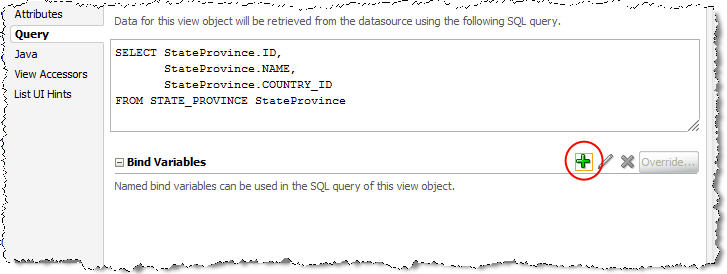
First, + expand the view folder in the Model project -> open the StateProvinceLOV by double clicking it -> click the Query tab.

Add the new bind variable that retrieves the states / provinces associated with the country selected by clicking the + icon beside Bind Variables.
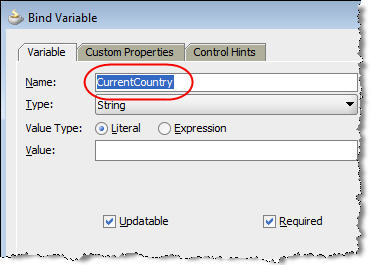
Enter the textCurrentCountry in the Name field -> click OK.
(4) Create the View Criteria
Create the new view criteria to filter the list of states / provinces displayed by clicking the + icon beside View Criteria.
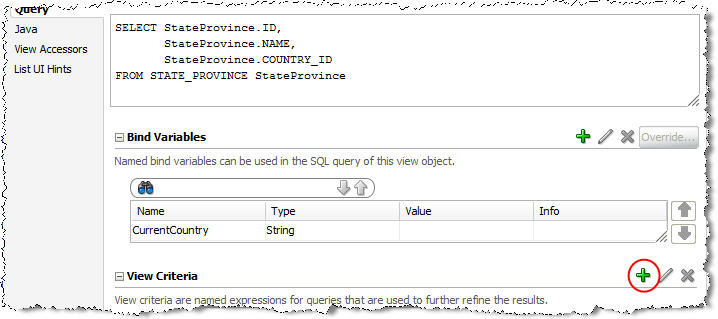
Click the Add Criteria button.

In the Attribute dropdown, select CountryId -> in the Operator dropdown, select Is not blank.
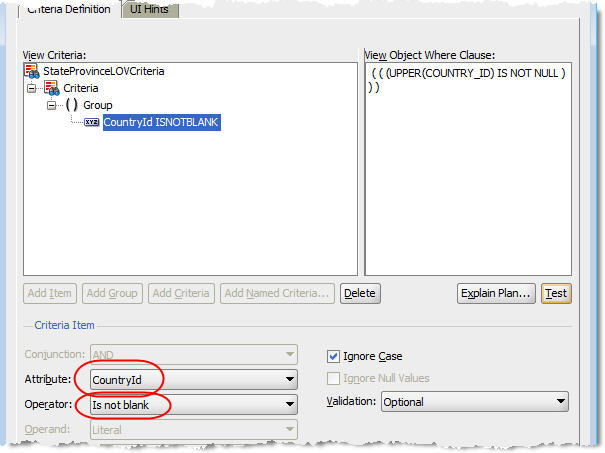
To add the additional criteria needed to ensure that the list only shows the states in the country that has been selected, click Criteria (1 below) -> click Add Criteria (2 below).

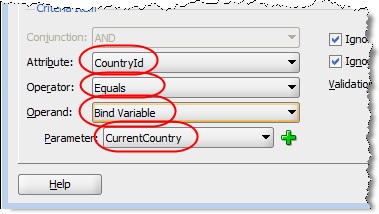
In the Attribute dropdown select CountryId -> in the Operator dropdown select Equals -> in the Operand dropdown select Bind Variable -> in the Parameter dropdown select CurrentCountry (the bind parameter that was created previously).
Your view criteria should now look like this.

Click OK.
(4) Associate the LOV View Objects with the Attributes of the View Object
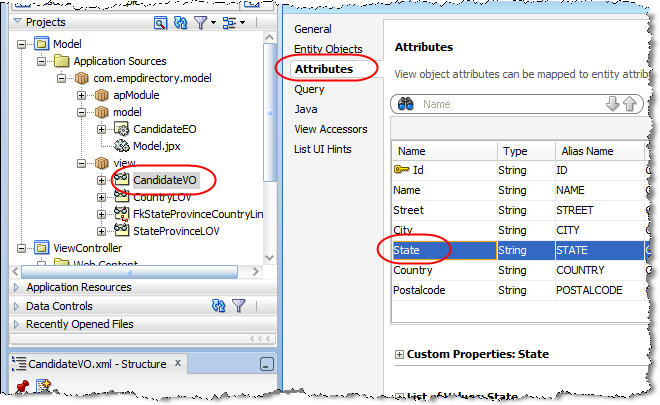
Associate the StateLOV to the CandidateVO’s State attribute by opening CandidateVO -> select the Attributes tab ->select the State attribute.
Click the + icon beside List of Values:State.

Click + beside the List Data Source dropdown.
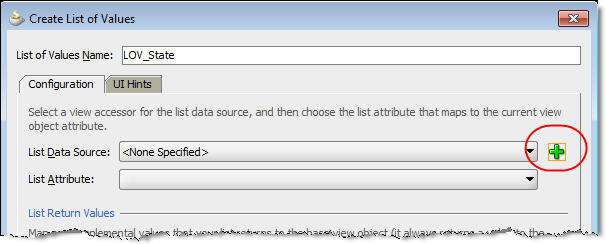
Click + to expand the list on the left ->select StateProvinceLOV->click the > icon.
From the List Attribute dropdown, select Id.

This means that the Id stored in the STATE_PROVINCE table (e.g., “TX”) will be the value that is stored when an item in the dropdown is selected.
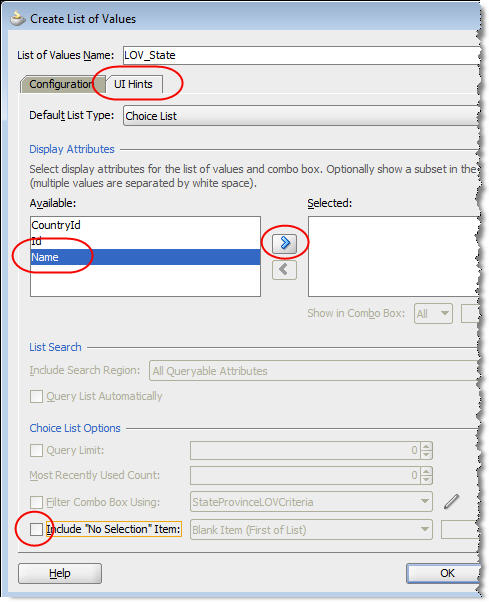
Click the UI Hints tab -> select Name from the list on the left -> click the > button -> uncheck the Include the “No Selection” Item checkbox.
Click + to expand the list on the left -> select CountryLOV -> click the > icon.
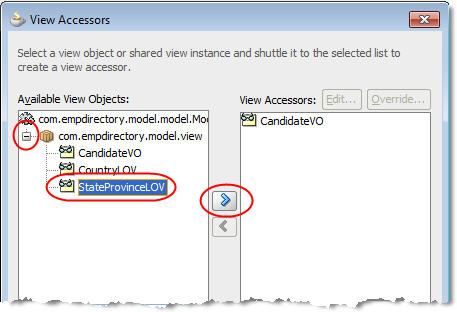
 (5) Change the View Accessor
In this you will add the information the CandidateVO needs to be able to list the states for the country that was selected.
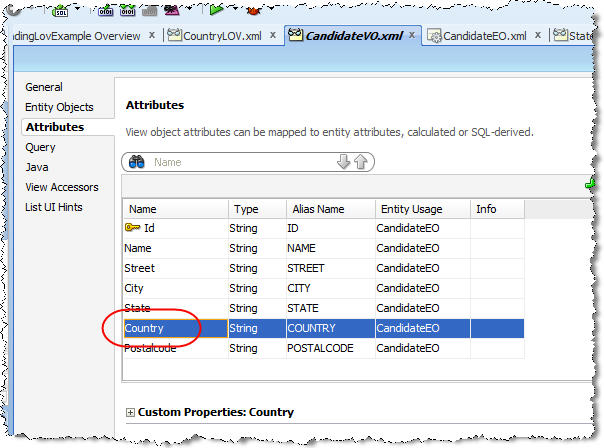
Before adding the View Accessor, double check the name of the attribute that stores the country information. With the Attributes tab selected, note that the text “Country” will be used to base the list of states on. Remember exactly how this attribute is spelled. This text will need to be entered when the accessor is added in the next step.
Add the view accessor by clicking the View Accessors tab -> select StateProviceLOV1 and click the pencil (Edit selected View Accessor) icon.

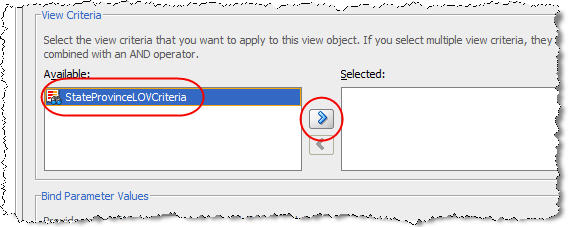
Select StateProvinceLOVCriteria -> click the > icon to move it to the list on the right.
Double click the Value field in the lower right corner and enter the name of the attribute to base the list of states on (Country in this case). This was determined at the beginning of this section.

Click OK.
Test the Form’s Cascading Dropdowns
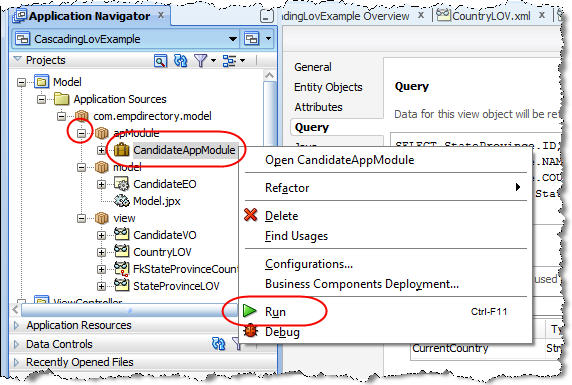
To test the Candidate view object and its cascading dropdowns, + expand the apModule package -> right mouse click the CandidateAppModule -> click Run.
Wait about a minute for the Application Module tester to appear. As shown below, double click the CandidateVO1 view object -> click the Country dropdown.

Select Canada from the list (a country that has provinces associated with it) -> click the State dropdown and note that the list has changed to the Canadian provinces.

Select one of the Canadian provinces from the list.
Select the Country dropdown and select United States. Note that after you have done this, the list of states changes dynamically back to the 50 states in the United States.
Summary
Although this appears to take quite a few steps, the sequence to create a cascading list of dropdown values are to:
- Create the Entity Object and the View Objects – These are the Entity Objects and View objects that will contain the cascading lists of values (CandidateEO and CandidateVO in this example)
- Create the LOVs – Create the list of values view objects that will be used to populate the lists (read-only StateProvinceLOV and CountryLOV views in this example).
- Create the Bind Variable in the Dependent LOV – In the dependent LOV (StateProvinceLOV in this example), create the bind variable (CurrentCountry in this example).
- Create the View Criteria in the Dependent LOV – In the dependent LOV (StateProvinceLOV in this example), indicate how the list should be filtered (e.g., base on the country selected)
- Associate the LOV View Objects with the Attributes of the View Object – In the dependent LOV (StateProvinceLOV in this example), create the view criteria that ensures the dependent list is (1) not populated if the country has not been selected or (2) shows the lists of states if a country has been selected (using the CurrentCountry bind parameter).
- Change the View Accessor – In the view object being used to display the information (CountryVO in this example), change the view accessor to use the view object’s correct attribute (the Country attribute in CountryVO).